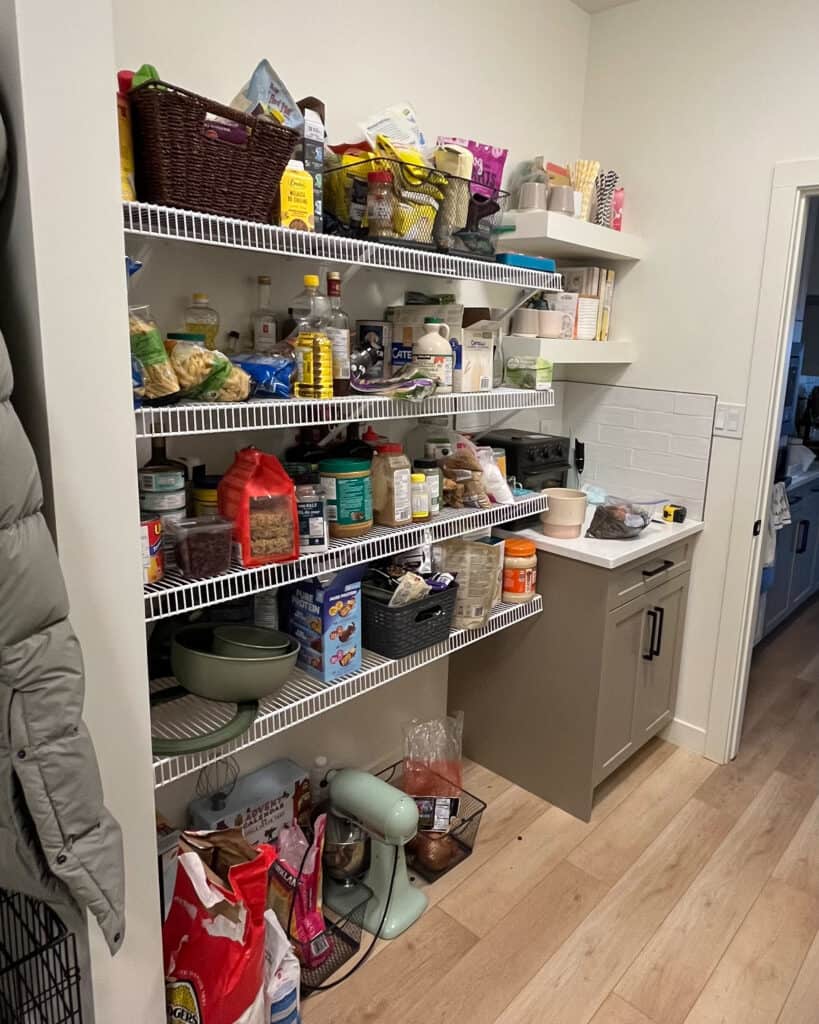
Our pantry renovation started with a problem that felt small but impacted our entire main living space. Because our kitchen is open concept with a walkthrough pantry, the pantry door is almost always open. While that’s great for everyday cooking, it also meant our builder-grade wire shelving and cramped coffee bar were always on display from both the kitchen and living room. The result was a pantry that felt cluttered, visually chaotic, and honestly a little embarrassing when hosting.
This IKEA pantry DIY completely transformed how the space looks and functions, without the cost or timeline of custom cabinetry.
This post contains affiliate links, which means I’ll receive a commission if you purchase through my link, at no extra cost to you.
Before: Why Our Builder-Grade Pantry Wasn’t Working
We built our house back in 2021 and the builder house plan we went with included a walk in pantry; however, it was a simple wire rack shelving in the base package without choosing to upgrade. At the time, we opted to upgrade one small section and add in a coffee bar section.
Our original pantry included:
- Wire rack shelving
- A small coffee bar add-on
- Open food storage on full display
While functional, it created several issues:
- Constant visual clutter
- A coffee bar that felt cramped and asymmetrical
- Appliances either crowding the kitchen or living on the pantry floor
- No concealed storage for dry goods
In hindsight, we regretted not extending the pantry coffee bar into full lower cabinetry with a countertop from the start.

Why We Didn’t Go Custom (and Chose an IKEA Pantry DIY Instead)
We decided that having cabinetry throughout the pantry was the feel we were looking for, so we contacted the kitchen contractor that had initially done our home-build to get pricing on extending the countertop and cabinets. We were given a rough budget of roughly $6,000-$8,000 just for the lower cabinets and countertop and then did not receive any further follow up with an actual quote or timelines. This was a frustrating outcome and also more than we planned on budgeting for renovating the pantry.
That price combined with our underwhelming experience with the quality of our original millwork — pushed us to explore alternatives.
After seeing IKEA cabinetry in person and researching DIY pantry IKEA projects, we realized:
- The quality was as good or better than our existing cabinetry
- The modular system allowed flexibility
- The cost savings were significant
My husband was confident we could achieve the look we wanted using IKEA cabinetry paired with locally sourced tile.
Pantry Goals & Design Vision
What We Wanted From the Space
- Clean and timeless
- Easy to maintain
- Highly functional for everyday cooking
- Flexible enough to evolve with our needs
Style Inspiration
- Minimal, European pantry vibes
- Neutral tones with warmth
- A balance of open shelving and closed storage
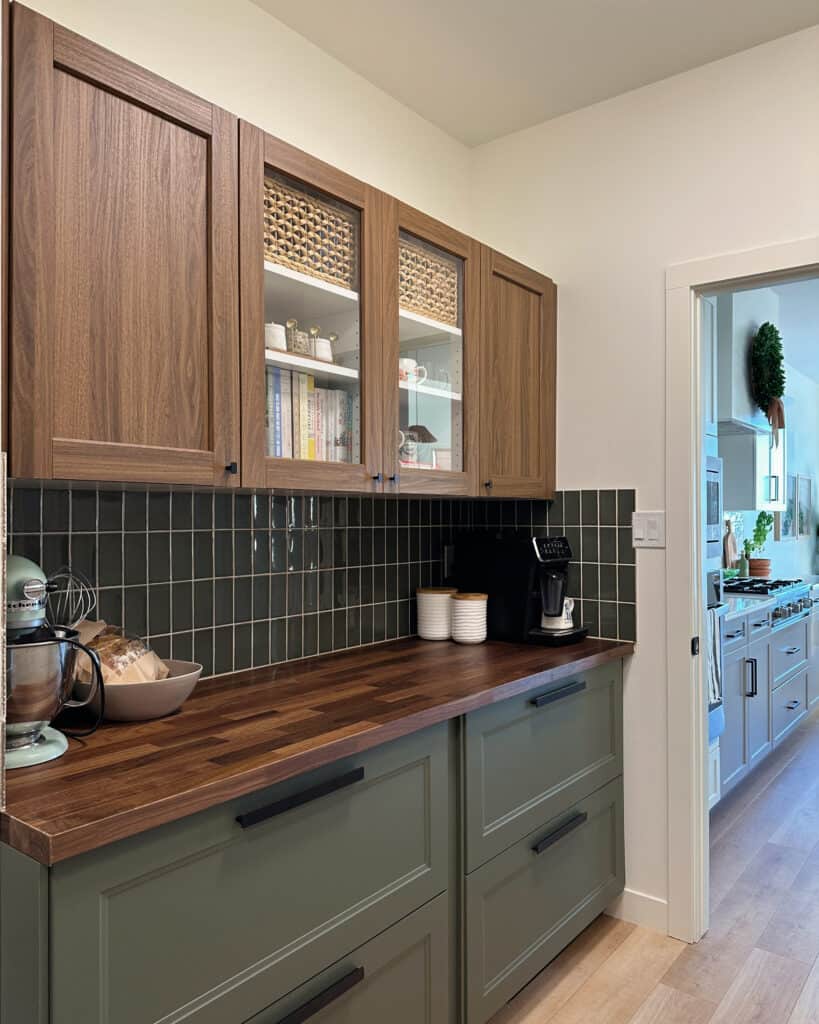
Our home palette leans toward soft whites, beige, black, marble, and walnut. Because the pantry is its own space, we leaned into something slightly more playful while still feeling cohesive.
Our Final Design Choices
- Sage green lower drawers
- Walnut countertop
- Walnut upper cabinets
- Black hardware
- Small-format sage tile backsplash
The goal was to move frequently used appliances — coffee machine, air fryer, KitchenAid mixer — out of the kitchen but still keep them accessible.
Just as important: no food on display.
Our Pantry Cabinet Configuration & Measurements
- Pantry wall: 77” wide x 108” high
- Lower drawers:
- 4 drawers
- 36” wide x 25” deep
- Upper cabinets:
- 4 cabinets
- 18” wide x 15” deep x 30” high
- Center uppers feature glass doors for mugs and cookbooks
Compared to the old 10”-deep wire shelving, the drawer storage alone was a massive upgrade.
The IKEA Products We Used (Full List) and The Tiles
Cabinets & Structure
- SEKTION cabinet boxes
- 36”W x 25”D lowers
- 18”W x 15”D uppers
- MAXIMERA drawers (36”W)
- AXSTAD drawer fronts (green)
Countertop & Panels
- KARLBY walnut veneer countertop (cut to size)
- Walnut and AXSTAD cover panels
- Matching toe-kick
Hardware
- HACKÅS handles and knobs
Tiles
- Yoko Series 2.5×5 Moss Tile – 19 square feet
- Tile Grout – Bone

Pantry Layout & Planning Tips
The IKEA kitchen planning tool was essential. After taking precise measurements of the pantry space and entering them into IKEA’s online planning tool, we were able to select the appropriate sizes, colours and options for upper and lower cabinets, countertop, and hardware. We decided that we would colour match the tile backsplash and make that order once we had the cabinetry materials in person.
Our Pantry space is 77” wide by 108” high. The IKEA Sektion line utilises a steel support rail that is fastened to the wall studs, and mounting heights of the rail are given in the instructions to achieve a typical countertop height of 36” from the floor and 18” spacing from countertop to the bottom of the upper cabinets.. The cabinetry attaches to the support rail, which makes for easy horizontal adjustments and leveling. The Sektion rail comes in a standard length of 84” and will need to be cut to length. This can be done with a zip disk or metal saw, we had to do this manually using a hacksaw, which was labour intensive, but luckily only two cuts had to be made.
Having solid fastening for the Sektion rail is probably the most important part of the project for peace of mind that your cabinets wont sag or tear away from the wall. The instructions specify that the rail should be fastened to the wall at 12” spacing. Our pantry wall is against the exterior wall of the house which is framed with 2×6 wood timbers at 24” spacing. In the 77” pantry space there was a stud at each end and two studs in the middle. We were able to attach the rail to 4 studs, in order to add additional support and meet the specified 12” fastener spacing, we added 3 – ¼” drywall toggle bolts that support up to 150lbs each. The last thing we want to wake up to is cabinets crashing off the walls.
Steps we took:
- Took precise measurements of the pantry
- Built the layout digitally
- Adjusted cabinet widths and heights for symmetry
- Waited to order tile until cabinetry was installed
SEKTION Rail Installation Notes
- Rails mount into wall studs
- Fasteners recommended every 12”
- Our exterior wall had 2×6 framing at 24” spacing
- We added ¼” drywall toggle bolts (rated to 150 lbs each) for extra support
This step is critical — solid rail installation is the foundation of the entire project.

Step-by-Step IKEA Pantry DIY Installation
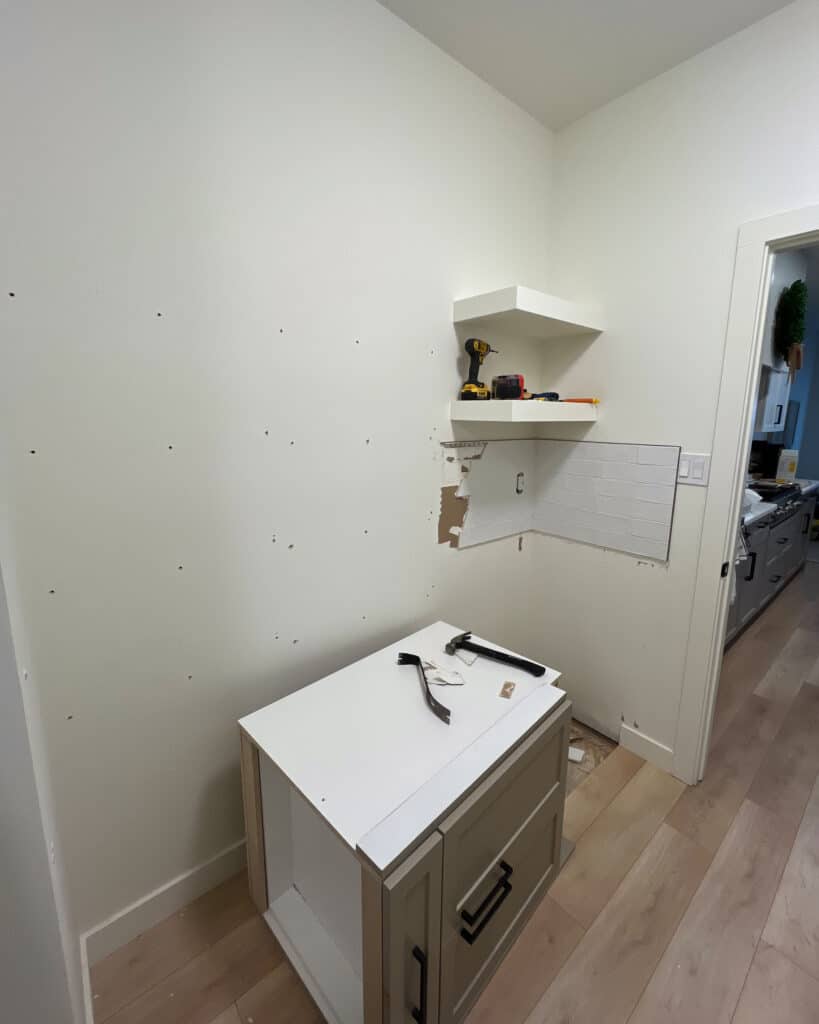
Step 1: Prepping the Space
Removing the old wire racks and coffee bar was a simple process and was completed in about 2 hours with just a hammer and pliers. The removal left quite a few holes in the drywall, we filled these using drywall filler and sanded them smooth. We didn’t bother with any touch up paint because they would all be covered with new cabinets or tiling.
There was a previous tile backsplash in the corner over the coffee station. Initially we tried to remove these using a hammer and pry-bar but while chipping them away, too much drywall started coming off and would be beyond repairable. So we decided to use an oscillating flush-cut saw to cut out the entire section of tile. This allowed us to have a clean square cutout in the wall where we could cut a new piece of drywall to size and reattach to the studs. Since the wall of the pantry is an exterior wall, there were some small cuts in the wall’s poly vapour barrier from the oscillating saw. We repaired these using Tuck Tape to ensure the wall was still sealed prior to adding in the new drywall. This repair was unexpected, but luckily there was no need to finish the repaired drywall seams (mudding/taping/sanding) as they would also be covered with tile in the finished product.


Step 2: Installing the Cabinets
Building IKEA cabinets is time-consuming but not physically demanding. The IKEA instructions are straightforward and easy to follow. We watched several YouTube videos on IKEA Sektion installs to get a feel for the process.
Installation order:
- Lower SEKTION rail
- Lower cabinet boxes
- Cover panels and fillers
- KARLBY countertop (cut to size)
- MAXIMERA drawers and hardware
- Toe-kick
- Upper SEKTION rail
- Upper cabinets (secured after tile)
- Doors and hardware
- Tile backsplash
- Grouting and caulking
Tools We Used During Demo & For Cabinet/Countertop Install:
- Safety glasses
- Utility knife
- Hammer
- Oscillating saw/flush cut – (used for precise cuts on the wood around baseboards, outlets, tile, etc. and during demolition)
- Screwdriver
- 6” speed square (used for checking if cabinet boxes were square and lining up small cuts)
- Standard #2 screws
- ¼” toggle bolts
- Power drill
- 2’ & 4’ level
- Tape measure
- Circular saw
- Adjustable clamps
- Table saw ( if you don’t have access to a table saw, you could use a hand saw or circular saw for cutting the filler pieces lengthwise, but having a table saw on hand will make for the straightest & fastest cuts)
- 6’ ladder
- Finish nailer (we used this as it was easier to make some of the filler panels and hide the nails, but you could also use glue and clamps or other methods)
- Hardware marking templates & 3/16” pilot drill bit
- Tile cutter & wet saw
Tools/Materials for Tile and Grouting:
- 2’/4’ level
- 2-½” x 5” tiles
- 3/16” notched tile trowel
- 1/16” tile spacers
- Acryl Pro Tile Adhesive
- Small putty knife
- Rubber finishing trowel for grout
- Tile Sponge
- 5 gallon bucket
- ½” Drill and mixing paddle attachment (for mixing grout)
- No-Sand Grout
- Tile cutter
- Wet tile saw
- Kitchen & bath caulking – colour matched to the grout

Step 3: Shelving & Interior Setup
We created clear zones:
- Baking supplies
- Pantry staples
- Coffee and breakfast
- Appliances
This made daily cooking faster and easier to maintain.
How We Organized the Pantry (Systems That Actually Work)
The biggest shift was prioritizing usability over aesthetics.
- Drawers for dry goods
- Cabinets for appliances and overflow
- Glass uppers for items we use daily
Pretty storage is great, but only if it’s also functional.


Budget Breakdown: IKEA Pantry DIY Cost
Cabinetry & IKEA Components
Total: $1,661
Tile & Grout
Total: $276
Grand Total
$1,977
Compared to the $6,000–$8,000 custom quote, this IKEA pantry DIY was a great budget-friendly option that didn’t compromise on aesthetic or function.
Is an IKEA Pantry DIY Worth It?
Pros:
- Affordable
- Customizable
- High-end look
- Flexible storage
Cons:
- Time-intensive
- Requires careful planning
- DIY confidence helps
If you want a polished, functional pantry without custom pricing, IKEA is absolutely worth it.
Final Thoughts: Living With Our IKEA Pantry
Day-to-day, this pantry works exactly how we hoped. Our appliances are off of the counters of the main kitchen area, there is no more visual clutter, and the space feels intentional and calm and beautiful.
For us, this IKEA pantry DIY was something that we wished we had done sooner as it’s made a massive impact on how our main living area feels in the day-to-day.
FAQ: IKEA Pantry DIY
Is IKEA good for pantries?
Yes — especially for drawers and concealed storage.
How much does an IKEA pantry DIY cost?
Typically $1,500–$3,000 depending on size and finishes.
Can you customize IKEA pantry cabinets?
Absolutely — hardware, fronts, tile, and organizers make all the difference.
Is IKEA better than custom cabinetry for a pantry?
For value and flexibility, often yes.
How long does installation take?
2–4 days depending on experience and scope.